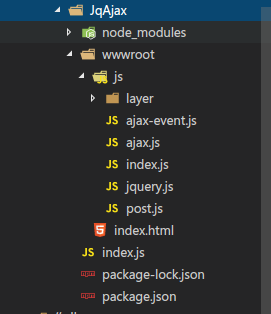
需要安装Node.js本地测试,本次还需下载layer弹出层插件和jQuery.js
**后端index.js:**
1. const exp = require('express')
2. const bodyParser = require('body-parser')
3. const app = exp()
4.
5. app.use(exp.static('wwwroot'))
6. app.use(bodyParser.urlencoded({extended:true}))
7. app.get('/api/user/login',(req,res)=>{
8. console.log(req.query)
9. res.status(200).json({status:'success',message:'登录成功'})
10. })
11. // 处理post请求
12. app.post('/api/user/login',(req,res)=>{
13. console.dir(req.body)
14. // req.get获取请求头
15. console.log(req.get('Connection'))
16. res.set('Y-school','zhiyou')
17. // res.set设置响应数据
18. setTimeout(function() {
19. res.status(200).json({status:'success',message:'登录成功'})
20. }, 6*1000);
21. })
22. app.listen(3000,function(){
23. console.log('服务器运行了')
24. })
**index.html**
1. <!DOCTYPE html>
2. <html lang="en">
3. <head>
4. <meta charset="UTF-8">
5. <meta name="viewport" content="width=device-width, initial-scale=1.0">
6. <meta http-equiv="X-UA-Compatible" content="ie=edge">
7. <title>Jquery Ajax</title>
8. </head>
9. <body>
10.
11. <button data-method="get">发起get请求</button>
12. <button id="btn" data-method ='POST'>发起post请求</button>
13. <script src="js/jquery.js"></script>
14. <script src="js/layer/layer.js"></script>
15. <script src="js/ajax-event.js"></script>
16. </body>
17. </html>
**index.js**
1. var button =document.querySelector('button')
2. // 发送get请求
3. button.onclick = function(){
4. $.get('/api/user/login', //请求的地址
5. {name:'黄海波',password:123456}, //发送数据
6. // 请求成功时运行的函数。
7. function(res,ree,ref){
8. // 第一个参数 返回结果的数据对象
9. // 第二个参数 status包含请求状态
10. // 第三个参数返回的是XMLHTTPrequest对象
11. // console.log(res.status)
12. // console.log(ree)
13. console.log(ref.responseText)
14.
15. })
16. }
17.
18. // 原生写法比较复杂 记得东西比较多
19.
20. // var xhr = new XMLHttpRequest()
21. // xhr.onreadystatechange = function(){
22. // if(xhr.readyState == 4){
23.
24. // }
25. // }
26. // xhr.open()
27. // xhr.send()
28.
29. // API Application Programing interface 应用程序编程接口
30.
31. // 程序员开发时直接使用调用的接口(类 对象 方法 属性 事件等 )
32. // 通过接口(连接点 可以将程序员的代码链接到一起)
33. // 程序员可以使用系统的人功能 或者其它功能代码库的功能
**post.js**
1. console.log($('#btn'))
2. $('#btn').click(function(){
3. console.log('cccccccc')
4. $.post('/api/user/login',
5. {name:'王宝强',password:'123456'},
6. function(res,statusText,jqXhr){
7. alert(res.message)
8.
9. alert(jqXhr.getResponseHeader('Y-school'))
10. alert(jqXhr.getResponseHeader('X-Powered-By'))
11. })
12. })
13. // $.post()专门发起post请求
14. // $.get()专门发起get请求
15. // 都需要四个参数
16. // 1 请求地址
17. // 2 发出的数据 如果是get请求会将数据urlencode
18. // 然后加到url后面 支持对象格式的数据
19. // 3 请求成功的回调函数:
20. // 1 服务端返回的数据(经过jquery转换的数据不需要再次手动转换)
21. // 2 Ajax请求的状态 success 表示成功
22. // 3 JqAjax 是jquery在xhr对象的基础上又增加了一些功能
23. // 通过第三个参数可以获取响应头及其他通过原生xhr才能
24. // 获取的数据 获取响应头getResponseHeader
25. // 4 服务端返回的数据类型(通常不用传 jquery会猜测类型)
**ajax.js**
1. layer.load(2,{shade:0.5})
2. // ajax()方法用于执行Ajax请求(异步http)
3. $.ajax({
4. // async:false 同步
5. // accepts:{
6. // fff:'text/json'
7. // },
8. // dataType:'fff',
9. // accepts 发送的内容类型请求头 用于告诉服务器
10. // 浏览器可以接受服务器返回何种类型的数据
11. // headers:{
12. // Accept:"application/json;charset=utf-8"
13. // },
14. // dataType预期的服务器响应的数据类型
15. dataType:'json',
16. cacle:false,
17. // 是否允许使用缓存 如果使用缓存 则有可能
18. // 不发起请求 直接使用上一次对同一个url请求获取数据
19. // contentType
20. // 发送数据到服务器时所使用的内容类型。默认是:"application/x-www-form-urlencoded"。
21. // 如果极个别情况下 需要使用multipart/form-data则需要修改这个值
22. // beforeSend:function(){
23. // // 在这里设置请求头
24. // alert('发送请求之前会调用')
25. // }
26. context:{title:'jquery Ajax',cc:'dd'},//请求成功时回调函数的this指向对象
27. data:{name:'宝强',password:'123456'},//发送给服务器的数据
28.
29. // dataFilter:function(data,type){
30. // // dataFilter处理服务端返回的数据类型
31. // console.log('ddd' + data)
32. // alert('正在对服务端返回的数据进行处理')
33. // if(type == 'json') return JSON.parse(data)
34.
35. // return data
36.
37. // // Jquery会自动处理大多数情况下服务端返回的数据
38. // },
39. error:function(xhr,status,err){
40. alert('发起一个错误' + err)
41. if(err == 'timeout'){
42. layer.alert('不好意思,网络超时了',{icon:5},function(){
43. layer.closeAll()
44. })
45. }
46. },
47. // 请求成功时的回调函数
48. success:function(data,status,xhr){
49. console.dir(this)
50. layer.closeAll()
51. // 关闭所有弹出层
52. },
53. // 自定义请求头
54. headers:{'Y-School':'wang'},
55. // success 请求成功时的回调函数
56. url:'/api/user/login', //请求地址
57. type:'POST', // 请求方式
58. // 设置本地的请求超时时间
59. timeout:5*1000,
60. })
**ajax-event.js**
1. var ajaxOptions = {
2. url:'/api/user/login',
3. data:{name:'wangzihao',password:'1234567'},
4. success:function(data){
5. layer.alert(data.message)
6. },
7. type:'POST',
8. timeout:5*1000
9. }
10. // 设置每一次请求都是用的参数即全局设置
11. // 如果某一次请求的参数设置为不同的值 则会覆盖全局设置
12. // 使用全局设置后每一次发起ajax请求都可以少传参数
13. $.ajaxSetup(ajaxOptions)
14. // ajaxStart是监听页面上所有的ajax事件
15. // ajaxError表示ajax请求失败
16. // ajaxComplete表示ajax请求完成 不管是失败还是完成都会complete
17. $(document).ajaxStart(function(){
18. layer.load(2)
19. }).ajaxError(function(){
20. layer.alert('不好意思,网络超时了',{icon:5},function(){
21. layer.closeAll()
22. })
23. }).ajaxComplete(function(){
24. console.log('ffffff')
25. layer.closeAll()
26. })
27.
28. $('button').click(function(){
29. if($(this).data('method') == 'GET'){
30. $.ajax({type:'GET'})
31. }
32. else{
33. $.ajax({ headers:{'Y-School':'wang'}})
34. // 发起请求
35. }
36. })