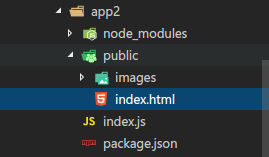
上图是下面将要使用的项目文件位置
**index.js**
1. var express = require('express')
2. var bodyParser = require('body-parser')
3. var app = express()
4. app.use(express.static('public'))
5. // app对象的use方法表示使用中间件
6. // 中间件是插入在请求响应过程中的一个处理程序
7. // 可以在处理请求之前预先处理数据或处理请求之后进行清理
8. // bodyParser的作用是将浏览器发送的请求转换为body对象
9. // 供程序处理请求时使用
10. // urlencoded 处理url的编码数据 通常是表单提交数据
11. // extended:true表示使用一种更强大的url编码格式 可以处理比较复杂的数据
12.
13.
14. app.use(bodyParser.urlencoded({extended:false}))
15. // post表示处理一个由浏览器发过来的post请求
16. // /user表示只处理发送到这个url的请求
17.
18. // 第二个参数function请求处理函数
19. // req表示所有浏览器发送请求数据及相关信息(请求)
20. // res表示将要发送给浏览器的所有数据(响应)
21. app.post('/user',function(req,res){
22. // post请求的数据不再查询字符串里
23. // 而在请求体中 所以需要从请求体中获取数据
24. // 请求体中获取数据借助于body-parser模块
25.
26. // 安装body-parser的方法
27. // 在命令行中运行(切换到当前的文件夹)
28. // npm install body-parser --save
29. // npm node package manager 是Node.js包管理工具
30. // install可以简写i
31. // body-parser 要安装的模块
32. // --save 将安装的模块包的名字保存到package.json文件中
33. var name = req.body.petname
34. var password = req.body.password
35. res.status(200).send('<strong>你提交的数据是</strong>' + name + '<br>' + password)
36. })
37. app.listen(3000,function(){
38. console.log('服务器运行了')
39. })
**index.html**
1. <!DOCTYPE html>
2. <html lang="en">
3. <head>
4. <meta charset="UTF-8">
5. <meta name="viewport" content="width=device-width, initial-scale=1.0">
6. <meta http-equiv="X-UA-Compatible" content="ie=edge">
7. <title>Document</title>
8. <style>
9. *{
10. box-sizing: border-box;
11. }
12. body{
13. margin: 0;
14. }
15. header{
16. background-color: #f93;
17. color: white;
18. height: 44px;
19. line-height: 44px;
20. text-align: center;
21. font-size: 18px;
22. }
23. form{
24. padding: 10px;
25. }
26. input,select{
27. display: block;
28. width:100%;
29. margin: 5px;
30. height: 40px;
31. padding: 10px;
32. font-size: 0.9rem;
33. border:1px solid silver;
34. /* 去掉chrome的特殊外观 */
35. /* -webkit-appearance: none; */
36. }
37.
38. .radio-group label{
39. display: inline-block;
40. width:90px;
41. margin: 5px auto;
42. height: 40px;
43. padding: 12px;
44. background-image: url(images/unselect.png);
45. background-size: 22px;
46. background-position: left center;
47. background-repeat: no-repeat;
48. font-size: 0.9rem;
49. }
50. input[type=radio]:checked+label{
51. background-image: url(images/select.png);
52. }
53. .radio-group input{
54. display: none;
55. }
56. input[type=submit]{
57. border-color: #e82;
58. background-color: #e82;
59. color: white;
60. font-size: 0.9rem;
61. line-height: 0.9rem;
62. margin-top: 15px;
63. }
64. option{
65. height: 36px;
66. display: inline-block;
67. line-height: 36px;
68. padding-top:10px;
69. }
70. </style>
71. </head>
72. <body>
73. <header>注册</header>
74. <form id="register" action="/user" method="POST" target="_blank">
75. <input type="text" name="petname" autofocus autocomplete="on" placeholder="请输入用户名"> <br>
76. <!-- autofocus会让输入焦点出现指定的输入框中 -->
77. <!-- pattern="[\u4e00-\u9fa5a-zA-Z0-9]{2,16}" -->
78. <!-- autocomplete 会记住用户之前输入的值 当双击输入时 会把之前记住的值列出来供用户选择 -->
79. <!-- required要求用户提交表单时必须填写 -->
80. <!-- 使用正则表达式 -->
81. <!-- []表示允许的字符范围
82. a-z 表示允许26个小写字母
83. 0-9表示允许数字
84. \u4e00-\u9fa5a允许汉字
85. {2,16}最少要求2个字符 最多16个字符 -->
86.
87. <input type="password" name="password" placeholder="请输入密码">
88. <input type="password" placeholder="请再次输入密码">
89. <!-- 如果两个普通input的name相同会导致同一个名字提交两个数据 -->
90. <div class="radio-group">
91. <input type="radio" name="isMale" id="male" checked>
92. <label for="male">先生</label>
93. <input type="radio" name="isMale" id="famale">
94. <label for="famale">先生</label>
95. </div>
96. <select name="course">
97. <option value="HTML5">HTML5</option>
98. <option value="CSS">CSS</option>
99. <option value="JavaScript">JavaScript</option>
100. </select>
101. <!-- <input type="submit" value="提交"> -->
102. </form>
103. <input type="submit" form="register" name="test" placeholder="会提交吗" formnovalidate>
104. <!--
105. 使用form属性可以将表单元素放在表单外面 去提交 form属性的值必须是另一个form的id
106. formnovalidate 可以单独在未验证状态下直接提交表单
107. formmethod
108. formtarget
109. formaction 都可以单独控制
110. -->
111. </body>
112. </html>