Stalwart Mail Server和Maddy Mail Server类似,都属于All-in-One一类,把SMTP/IMAP等邮件服务器需要用到的东西都整合进去了。但是相比较之下Stalwart Mail Server整合度更高。
一个最明显的差异是Maddy虽然支持rspamd反垃圾邮件,但是还需要你自己额外安装配置rspamd,而Stalwart是直接把反垃圾邮件这个功能给整合进去了,还自带了一套Sieve脚本,属于是开箱即用了。可以看到官方项目页面的介绍:
> Spam and Phishing filter:
> Comprehensive set of filtering rules on par with popular solutions.
>
> Statistical spam classifier with automatic training capabilities.
>
> DNS Blocklists (DNSBLs) checking of IP addresses, domains, and hashes.
>
> Collaborative digest-based spam filtering with Pyzor.
>
> Phishing protection against homographic URL attacks, sender spoofing and other techniques.
>
> Trusted reply tracking to recognize and prioritize genuine e-mail replies.
>
> Sender reputation monitoring by IP address, ASN, domain and email address.
>
> Greylisting to temporarily defer unknown senders.
>
> Spam traps to set up decoy email addresses that catch and analyze spam.
你就说牛不牛逼吧。。咱废话也不多说了,下面部署一个测试看看。
安装docker:
apt -y update
apt -y install curl
curl -fsSL https://get.docker.com -o get-docker.sh
sh get-docker.sh
准备目录和compose文件:
mkdir -p /opt/mail-server && cd /opt/mail-server && nano docker-compose.yml写入如下配置:
version: '3.8'
services:
  stalwart-mail:
    image: stalwartlabs/mail-server:latest
    container_name: stalwart-mail
    restart: unless-stopped
    ports:
      - "25:25"
      - "143:143"
#     - "443:443"
      - "465:465"
      - "587:587"
      - "993:993"
      - "4190:4190"
    volumes:
      - ./stalwart-mail-data:/opt/stalwart-mail
备注:如果需要用内置的ACME来申请TLS证书,可以去掉443端口的注释。因考虑到一台服务器上可能还运行着其他的服务需要用到443端口,这里就手动申请证书了。
启动:
docker compose up -d初次运行需要执行下面的脚本来创建配置文件:
docker exec -it stalwart-mail /bin/sh /usr/local/bin/configure.sh配置过程如下:
✔ Which database would you like to use? · RocksDB (recommended for single-node setups)
✔ Where would you like to store e-mails and other large binaries? · RocksDB
✔ Where would you like to store the full-text index? · RocksDB
✔ Where would you like to store the anti-spam database? · RocksDB
✔ Do you already have a directory or database containing your user accounts? · No, I want Stalwart to store my user accounts in RocksDB
✔ What is your main domain name? (you can add others later) · example.com
✔ What is your server hostname? · mail.example.com
Do you want the TLS certificates for mail.example.com to be obtained automatically from Let's Encrypt using ACME? [y/n] n
[备注1]对于单节点部署来说的话,建议直接全部选择用RocksDB,可以真正做到开箱即用。
[备注2]将example.com替换为你的实际域名。
[备注3]不选择使用内置的ACME来申请TLS证书,因为之前的compose配置没有启用443端口。
配置完成之后,需要在日志文件中找到管理员的账号和密码:
cat /opt/mail-server/stalwart-mail-data/logs/stalwart.log.2024-03-05如图:

以及根据给出的DNS记录来配置DKIM、SPF、DMARC:

以CloudFlare为例:

[备注]别忘了添加A记录以及MX记录。
然后把手动申请到的TLS证书复制到如下目录内:
/opt/mail-server/stalwart-mail-data/etc/certs/mail.example.com[备注1]将example.com替换为你的实际域名。
[备注2]注意证书和私钥的文件名务必是:fullchain.pem、privkey.pem。如不是这两个文件名则需要修改如下配置文件:
nano /opt/mail-server/stalwart-mail-data/etc/common/tls.toml指定你的证书和私钥文件名:
[certificate."default"]
cert = "file:///opt/stalwart-mail/etc/certs/mail.example.com/fullchain.pem"
private-key = "file:///opt/stalwart-mail/etc/certs/mail.example.com/privkey.pem"
[备注1]不要修改证书和私钥的绝对路径。
重启容器使之前的配置生效:
docker compose down
docker compose up -d
现在需要添加域名:
docker compose exec stalwart-mail stalwart-cli -u https://127.0.0.1:443 -c admin:password domain create example.com[备注1]将password替换为之前在日志中查看到的管理员密码。
[备注2]将example.com替换为你的实际域名。
创建用户账户(邮箱):
docker compose exec stalwart-mail stalwart-cli -u https://127.0.0.1:443 -c admin:password account create -d "test" -i false -a "imlala@example.com" imlala pass[备注1]这条命令将创建一个用户名为imlala密码为pass的普通用户账户,邮箱地址是imlala@example.com
[备注2]各个选项的作用:https://stalw.art/docs/management/directory/accounts/
至此整个部署过程就全部完成了,现在你可以尝试收发信件。
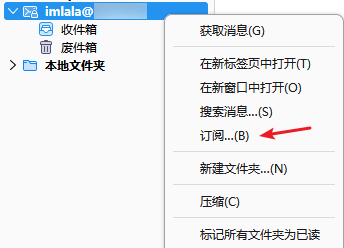
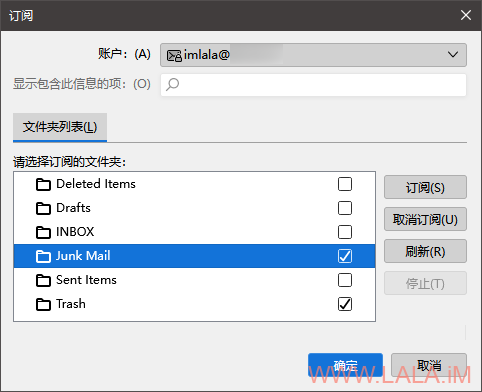
补充一点邮件客户端这块的设置,以Thunderbird为例,需要手动订阅Junk Mail文件夹,不然被标记为垃圾邮件的邮件无法查看到:
另外不要给文件夹改名成中文,会有乱码的问题。