
这里我们直接搜索下载后激活安装插件。
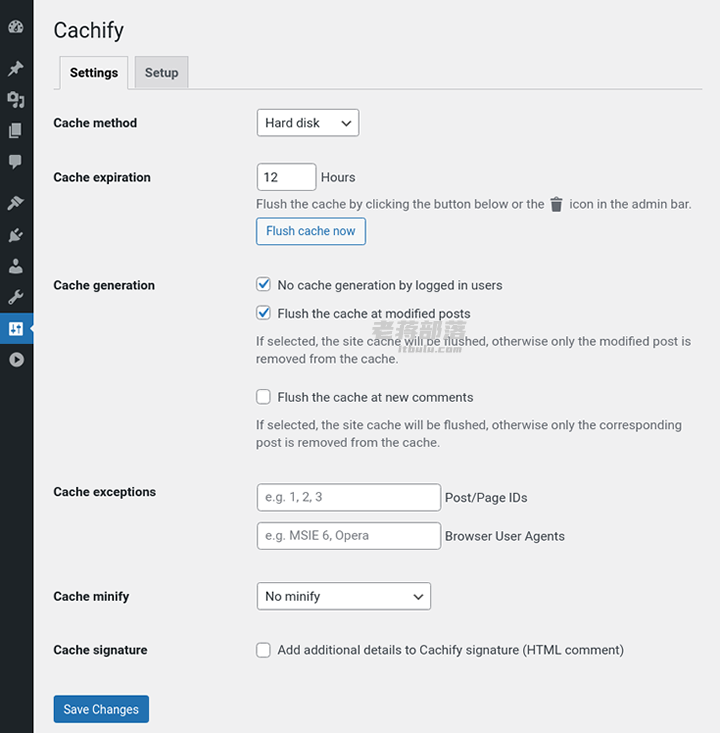
如果我们仅仅只用这个插件的话,可以选择硬盘加速模式。
#A description for only https and sites that are accessible via https and http follows below.
#Extension of the .htaccess (Apache), if the website is only accessible via http: (https://gist.github.com/sergejmueller/2027249#file-htaccess)
#.htaccess extension for websites that can be reached under both http and https: (https://gist.github.com/mcguffin/31f80070d631d56da23cefb4ef1b6649)
# BEGINN CACHIFY
<IfModule mod_rewrite.c>
    # ENGINE ON
    RewriteEngine On
    # GZIP FILE
    <IfModule mod_mime.c>
        RewriteCond %{REQUEST_URI} /$
        RewriteCond %{REQUEST_URI} !^/(wp-admin|wp-content/cache)/.*
        RewriteCond %{REQUEST_METHOD} !=POST
        RewriteCond %{QUERY_STRING} =""
        RewriteCond %{HTTP_COOKIE} !(wp-postpass|wordpress_logged_in|comment_author)_
        RewriteCond %{HTTP:Accept-Encoding} gzip
        RewriteCond %{DOCUMENT_ROOT}/path to/wp-content/cache/cachify/%{HTTP_HOST}%{REQUEST_URI}index.html.gz -f
        RewriteRule ^(.*) /path to/wp-content/cache/cachify/%{HTTP_HOST}%{REQUEST_URI}index.html.gz [L]
        AddType text/html .gz
        AddEncoding gzip .gz
    </IfModule>
    # HTML FILE
    RewriteCond %{REQUEST_URI} /$
    RewriteCond %{REQUEST_URI} !^/(wp-admin|wp-content/cache)/.*
    RewriteCond %{REQUEST_METHOD} !=POST
    RewriteCond %{QUERY_STRING} =""
    RewriteCond %{HTTP_COOKIE} !(wp-postpass|wordpress_logged_in|comment_author)_
    RewriteCond %{DOCUMENT_ROOT}/path to/wp-content/cache/cachify/%{HTTP_HOST}%{REQUEST_URI}index.html -f
    RewriteRule ^(.*) /path to/wp-content/cache/cachify/%{HTTP_HOST}%{REQUEST_URI}index.html [L]
</IfModule>
# END CACHIFY
#Nginx configuration file extension (https://gist.github.com/sergejmueller/1939164#file-gistfile1-nginxconf)
## GZIP
gzip_static on;

## CHARSET
charset utf-8;

## INDEX LOCATION
location / {
    if ( $query_string ) {
        return 405;
    }
    if ( $request_method = POST ) {
        return 405;
    }
    if ( $request_uri ~ /wp-admin/ ) {
        return 405;
    }
    if ( $http_cookie ~ (wp-postpass|wordpress_logged_in|comment_author)_ ) {
        return 405;
    }
    error_page 405 = @nocache;
    try_files /wp-content/cache/cachify/https-${host}${uri}index.html /wp-content/cache/cachify/${host}${uri}index.html @nocache;
}

## NOCACHE LOCATION
location @nocache {
    try_files $uri $uri/ /index.php?$args;
}

## PROTECT CACHE
location ~ /wp-content/cache {
    internal;
}
如果我们选择的是硬盘换成,需要在上面 修改我们的.htaccess或者是Nginx配置配置文件。
我们还可以配合Memcached进行加速,比如我们在上图中选择Memcached加速模式,但是前提是我们的当前服务器是有安装Memcached。
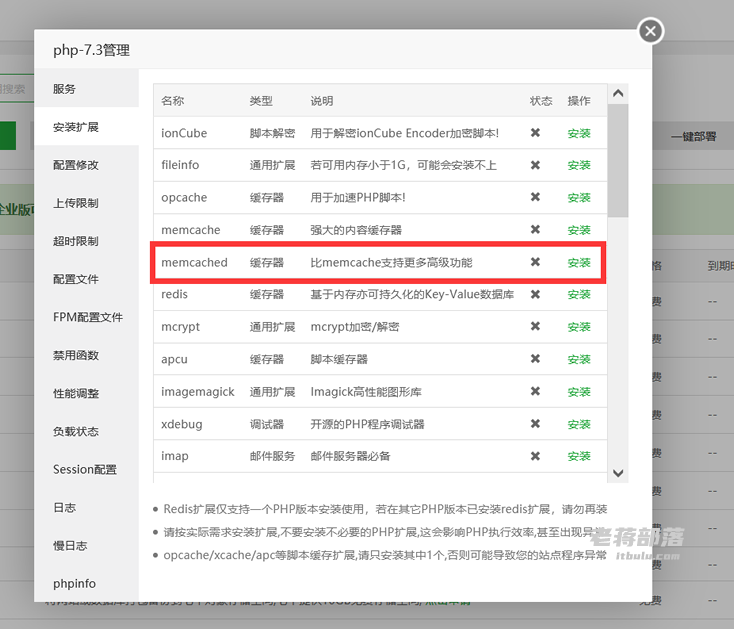
比如我们在用宝塔面板的话,需要启动安装Memcached软件。
然后在站点配置中还需要配置设置。
#Extension of the Nginx configuration file (https://gist.github.com/sergejmueller/6113816#file-gistfile1-txt)
#If you have errors please try to change memcached_pass localhost:11211; to memcached_pass 127.0.0.1:11211; This forces IPv4 because some servers that allow ipv4 and ipv6 are configured to bind memcached to ipv4 only.
## GZIP
gzip_static on;
## CHARSET
charset utf-8;
## INDEX LOCATION
location / {
    error_page 404 405 = @nocache;

    if ( $query_string ) {
        return 405;
    }
    if ( $request_method = POST ) {
        return 405;
    }
    if ( $request_uri ~ "/wp-" ) {
        return 405;
    }
    if ( $http_cookie ~ (wp-postpass|wordpress_logged_in|comment_author)_ ) {
        return 405;
    }
    default_type text/html;
    add_header X-Powered-By Cachify;
    set $memcached_key $host$uri;
    memcached_pass localhost:11211;
}
location @nocache {
    try_files $uri $uri/ /index.php?$args;
}
这是官方给的示范Nginx设置。
这里,老蒋知道这个Cachify插件是可以实现WordPress缓存加速的,后面实战详细的来操作介绍使用Cachify插件的加速功能。