第一、确定64MB内存VPS环境以及精简系统
这里老蒋采用Debian 6 32位系统环境,而且需要升级到最新系统包环境,以及要进行Debian的精简。
> apt-get update&&apt-get upgrade #升级系统
> apt-get -y purge apache2- bind9- xinetd samba- nscd- portmap sendmail-* sasl2-bin #移除多余的软件
> apt-get -y purge lynx memtester unixodbc python- odbcinst- sudo tcpdump ttf-* #移除多余的组件
> apt-get autoremove && apt-get clean #清理缓存文件
这里,我们要先对debian系统进行升级、精简不必要的自带软件和组件,这样可以在一定程度上节省几M内存占用。
第二、安装Lighttpd,SQLite和PHP建站环境
因为考虑到MYSQL占用资源较大,即便能够安装,后面基本也跑不动,除非就自己玩玩,所以还是准备使用SQLITE数据库,因为ZBLOG PHP和TYPECHO程序都带的,占用资源很小。
A - 安装系统必须要的环境和组件
> apt-get install sqlite #安装sqlite数据库
> apt-get install lighttpd #安装lighttpd引擎驱动
> apt-get install php5-cgi php5-curl php5-gd php5-idn php-pear php5-imagick php5-imap php5-mcrypt php5-mhash php5-ming php5-ps php5-pspell php5-recode php5-snmp php5-sqlite php5-tidy php5-xmlrpc php5-xsl #安装PHP以及相关站点需要的组件
B - 配置系统文件
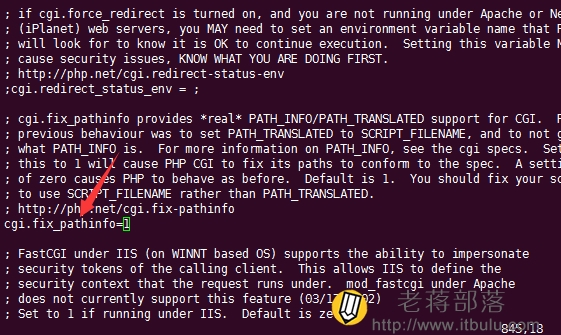
修改/etc/php5/cgi/php.ini文件中的cgi.fix_pathinfo参数,取消前面的;然后检查参数值是不是1,如果不是需要修改成1
C - 建立WWW单独用户
useradd -d /home/wwwroot -m -s /bin/bash www
D - 修改Lighttpd配置文件(/etc/lighttpd/lighttpd.conf)
> server.modules = (
> "mod_access",
> "mod_alias",
> "mod_compress",
> "mod_redirect",
> "mod_rewrite",
> "mod_fastcgi",
> )
> server.document-root = "/var/www"
> server.upload-dirs = ( "/var/cache/lighttpd/uploads" )
> server.errorlog = "/var/log/lighttpd/error.log"
> server.pid-file = "/var/run/lighttpd.pid"
> server.username = "www"
> server.groupname = "www"
> index-file.names = ( "index.php", "index.html",
> "index.htm", "default.htm",
> " index.lighttpd.html" )
> url.access-deny = ( "~", ".inc" )
> static-file.exclude-extensions = ( ".php", ".pl", ".fcgi" )
> include_shell "/usr/share/lighttpd/use-ipv6.pl"
> dir-listing.encoding = "utf-8"
> server.dir-listing = "enable"
> compress.cache-dir = "/var/cache/lighttpd/compress/"
> compress.filetype = ( "application/x-javascript", "text/css", "text/html", "text/plain" )
> include_shell "/usr/share/lighttpd/create-mime.assign.pl"
> include_shell "/usr/share/lighttpd/include-conf-enabled.pl"
> fastcgi.server = ( ".php" => ((
> "bin-path" => "/usr/bin/php5-cgi",
> "socket" => "/tmp/php.socket",
> "max-procs" => 1,
> "bin-environment" => (
> "PHP_FCGI_CHILDREN" => "4",
> "PHP_FCGI_MAX_REQUESTS" => "1000"
> ),
> )))
修改内容如上。
E - 设置Lighttpd拥有者权限和重启Lighttpd
> chown -R www:www /var/log/lighttpd
> /etc/init.d/lighttpd restart
这里我们的环境就配置完毕,后面就只需要创建站点建站。
第三、64MB内存VPS环境添加站点
> mkdir -p /home/wwwroot/itbulu
> mkdir -p /home/wwwroot/itbulu/public
手工添加站点目录。
> chown www:www /home/wwwroot/itbulu/public
修改目录所有权。
> chown -R www:www /var/log/lighttpd
lighttpd日志目录存放所有权。
> /etc/lighttpd/lighttpd.conf
配置lighttpd.conf文件设定站点。在文件最后,添加下面脚本配置站点。
> $HTTP["host"] =~ "(^|\.)itbulu\.com$" {
> server.document-root = "/home/wwwroot/itbulu/public"
> accesslog.filename = "/var/log/lighttpd/itbulu/access.log"
> server.error-handler-404 = "/404.html"
> }
这里我们需要对应创建的目录和站点域名对应修改。
/etc/init.d/lighttpd restart
重启lighttpd生效。
这样,我们站点就创建完毕,后面我们做什么呢?肯定是搭建我们需要的Typecho或者ZBLOG PHP程序。